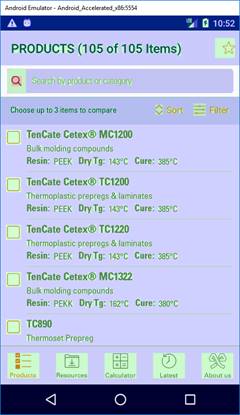
Now you developed your first version of your app in Xamarin Forms, it could be possible that the performance is not optimal. For example your app seems to be unresponsive, loading of views takes long or scrolling is slow.
What options do you have to increase the performance of your app. On the Microsoft Docs website you find an excellent article about Xamarin Forms Perfomance: https://docs.microsoft.com/en-us/xamarin/xamarin-forms/deploy-test/performance .
I will use a couple of those recommendations to optimize the first version of an app I developed. I will focus on the Android implementation of the app because I make use of a Windows platform with Visual Studio to develop my apps.
First I will discuss a couple of Performance tools we have on the Android platform:
- Hierarchy Viewer
- GPU Profile renderer
- GPU Overdraw
But to see those tools you first have to activate the Developer options on you mobile device: find Build number in the Settings of your device. Normally you can find it via Settings > About device > Build number.

When you have found it, tap 7 times on the Build number. After two taps, a small pop up notification should appear saying "you are now X steps away from being a developer" with a number that counts down with every additional tap. After 7 times the developer options should be presented in the main Settings menu.
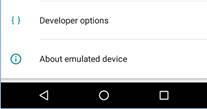
Although I activate the Developer options in the Android emulator, this should work the same on a normal Android device.
Now we switched on the Developer options we can start with the investigation of our app.
In this blog I focus on GP Overdraw.
GPU Overdraw
Overdraw occurs when your app draws the same pixel more than once within the same frame. So this visualization shows where your app might be doing more rendering work than necessary, which can be a performance problem due to extra GPU effort to render pixels that won't be visible to the user.
To visualize overdraw on your device, proceed as follows:
- On your device, go to Settings and tap Developer Options.
- Scroll down to the Hardware accelerated rendering section, and select Debug GPU Overdraw.

- In the Debug GPU overdraw dialog, select Show overdraw areas.
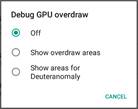
Now your device shows overdraw on every screen in every app:
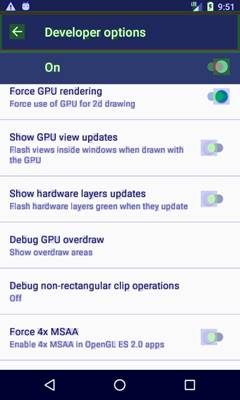
Android colors UI elements to identify the amount of overdraw as follows:
- True color: No overdraw
- Blue: Overdrawn 1 time
- Green: Overdrawn 2 times
- Pink: Overdrawn 3 times
- Red: Overdrawn 4 or more times
Navigate to you app to see the overdraw intensity:
Note: some overdraw is unavoidable. As you are tuning your app's user interface, try to arrive at a visualization that shows mostly true colors or only 1X overdraw (blue).
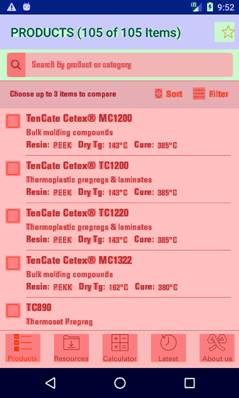


Products screen Product screen
As you can see here, each pixel on those layouts are overdrawn 4 or more times. So optimization of the layout of those screens is desirable.
Toolbar
You can define a toolbar with a tabbedpage like:
<?xml version="1.0" encoding="utf-8" ?>
<TabbedPage xmlns="http://xamarin.com/schemas/2014/forms"
xmlns:x="http://schemas.microsoft.com/WinFS/2009/calm"
xmlns:android="clr-namespace:Xamarin.Forms.PlatformConfiguration.AndroidSpecific;assembly=Xamarin.Forms.Core"
xmlns:trans="clr-namespace:TenCate_App.Helpers;assembly=VraagEva"
android:TabbedPage.ToolbarPlacement="Bottom"
android:TabbedPage.BarItemColor="#FFFFFF"
android:TabbedPage.BarSelectedItemColor="#ff9595"
xmlns:views="clr-namespace:TenCate_App.Views"
BackgroundColor="#5e545c"
x:Class=" TenCate_App.Views.MainPage">
<TabbedPage.Children>
<NavigationPage Title="{trans:Translate products}" Icon=" products.png" >
<x:Arguments>
<views:ProductsPage />
</x:Arguments>
</NavigationPage>
<NavigationPage Title="{trans:Translate Resources}" Icon="resources.png">
<x:Arguments>
<views:ResourcesPage />
</x:Arguments>
</NavigationPage>
<NavigationPage Title="{trans: Translate Calculator}" Icon="calculator.png">
<x:Arguments>
<views:CalculatorPage />
</x:Arguments>
</NavigationPage>
<NavigationPage Title="{trans:Translate Latest}" Icon="latest.png">
<x:Arguments>
<views:LatestPage />
</x:Arguments>
</NavigationPage>
<NavigationPage Title="{trans:Translate AboutUs}" Icon="aboutus.png">
<x:Arguments>
<views:AboutUsPage />
</x:Arguments>
</NavigationPage>
</TabbedPage.Children>
</TabbedPage>
In iOS the toolbar is presented at the bottom standardly. In Android however, it is presented at the top. But that is not what we wanted for this app. The iOS implementation should look identical t the Android implementation and vice versa as much as possible.
From Xamarin.Forms version 3.1 you can define tabbedpage properties for Android:
- android:TabbedPage.ToolbarPlacement="Bottom"
This presents the toolbar at the bottom in Android. In iOS the toolbar is presented at the bottom already.
- android:TabbedPage.BarItemColor="#FFFFFF"
Defines the color of a toolbar item.
- android:TabbedPage.BarSelectedItemColor="#ff9595"
Defines the color of a selected toolbar item.
However in this version of the app Xamarin Forms version 3.0 is being used so using a tabbedpage for the toolbar was not an option.
To show the toolbar at the bottom in iOS as well as Android I defined a ControlTemplate in the App.xaml:
<ControlTemplate x:Key="PageTemplate">
<AbsoluteLayout>
<!--AbsoluteLayout.LayoutBounds: x,y,width,height-->
<StackLayout AbsoluteLayout.LayoutBounds="0,0,1,1" AbsoluteLayout.LayoutFlags="All"
HorizontalOptions="FillAndExpand" Spacing="0">
<ContentPresenter VerticalOptions="FillAndExpand" />
<StackLayout AbsoluteLayout.LayoutBounds="0,1,1,65" AbsoluteLayout.LayoutFlags="XProportional,YProportional,WidthProportional" Spacing="0">
<BoxView HeightRequest="1" HorizontalOptions="FillAndExpand" Color="{StaticResource GreyColor50}" />
<StackLayout Style="{StaticResource NavigationBarStackLayoutStyle}">
<StackLayout Style="{StaticResource ButtonNavigationBarStackLayoutStyle}" x:Name="stckProducts">
<StackLayout.GestureRecognizers>
<TapGestureRecognizer Tapped="OnTappedProducts"/>
</StackLayout.GestureRecognizers>
<Image AutomationId="ProductsButton" Margin="0,5,0,10" Style="{StaticResource ButtonNavigationBarImageStyle}" Source="{TemplateBinding ProductsImage}" />
</StackLayout>
<StackLayout Style="{StaticResource ButtonNavigationBarStackLayoutStyle}" x:Name="stckResources">
<StackLayout.GestureRecognizers>
<TapGestureRecognizer Tapped="OnTappedResources"/>
</StackLayout.GestureRecognizers>
<Image AutomationId="ResourcesButton" Margin="0,5,0,10" x:Name="imgResources" Style="{StaticResource ButtonNavigationBarImageStyle}" Source="{TemplateBinding ResourcesImage}" />
</StackLayout>
<StackLayout Style="{StaticResource ButtonNavigationBarStackLayoutStyle}" x:Name="stckCalculator">
<StackLayout.GestureRecognizers>
<TapGestureRecognizer Tapped="OnTappedCalculator"/>
</StackLayout.GestureRecognizers>
<Image AutomationId="CalculatorButton" Margin="0,5,0,10" x:Name="imgCalculator" Style="{StaticResource ButtonNavigationBarImageStyle}" Source="{TemplateBinding CalculatorImage}" />
</StackLayout>
<StackLayout Style="{StaticResource ButtonNavigationBarStackLayoutStyle}" x:Name="stckLatest">
<StackLayout.GestureRecognizers>
<TapGestureRecognizer Tapped="OnTappedLatest"/>
</StackLayout.GestureRecognizers>
<Image AutomationId="LatestButton" Margin="0,5,0,10" x:Name="imgLatest" Style="{StaticResource ButtonNavigationBarImageStyle}" Source="{TemplateBinding LatestImage}" />
</StackLayout>
<StackLayout Style="{StaticResource ButtonNavigationBarStackLayoutStyle}" x:Name="stckAboutUs">
<StackLayout.GestureRecognizers>
<TapGestureRecognizer Tapped="OnTappedAboutUs"/>
</StackLayout.GestureRecognizers>
<Image AutomationId="AboutUsButton" Margin="0,5,0,10" x:Name="imgAboutUs" Style="{StaticResource ButtonNavigationBarImageStyle}" Source="{TemplateBinding AboutUsImage}" />
</StackLayout>
</StackLayout>
</StackLayout>
</StackLayout>
</AbsoluteLayout>
</ControlTemplate>
But as you can see in the overdraw picture this implementation generated a lot of overdraw on the screen.
So I changed it to a more optimal implementation:
<ControlTemplate x:Key="PageTemplate">
<AbsoluteLayout>
<!--AbsoluteLayout.LayoutBounds: x,y,width,height-->
<StackLayout AbsoluteLayout.LayoutBounds="0,0,1,1" AbsoluteLayout.LayoutFlags="All"
HorizontalOptions="FillAndExpand" Spacing="0">
<ContentPresenter VerticalOptions="FillAndExpand" />
<Grid AbsoluteLayout.LayoutBounds="0,1,1,65" AbsoluteLayout.LayoutFlags="XProportional,YProportional,WidthProportional">
<Grid.RowDefinitions>
<RowDefinition Height="1"></RowDefinition>
<RowDefinition Height="*"></RowDefinition>
</Grid.RowDefinitions>
<Grid.ColumnDefinitions>
<ColumnDefinition Width="*"></ColumnDefinition>
<ColumnDefinition Width="*"></ColumnDefinition>
<ColumnDefinition Width="*"></ColumnDefinition>
<ColumnDefinition Width="*"></ColumnDefinition>
<ColumnDefinition Width="*"></ColumnDefinition>
</Grid.ColumnDefinitions>
<BoxView Grid.Row="0" Grid.Column="0" Grid.ColumnSpan="5" HeightRequest="1" HorizontalOptions="FillAndExpand" Color="{StaticResource GreyColor50}" />
<Image Grid.Row="1" Grid.Column="0" AutomationId="ProductsButton" Margin="0,5,0,10" Style="{StaticResource ButtonNavigationBarImageStyle}" Source="{TemplateBinding ProductsImage}">
<Image.GestureRecognizers>
<TapGestureRecognizer Tapped="OnTappedProducts"/>
</Image.GestureRecognizers>
</Image>
<Image Grid.Row="1" Grid.Column="1" AutomationId="ResourcesButton" Margin="0,5,0,10" x:Name="imgResources" Style="{StaticResource ButtonNavigationBarImageStyle}" Source="{TemplateBinding ResourcesImage}">
<Image.GestureRecognizers>
<TapGestureRecognizer Tapped="OnTappedResources"/>
</Image.GestureRecognizers>
</Image>
<Image Grid.Row="1" Grid.Column="2" AutomationId="CalculatorButton" Margin="0,5,0,10" x:Name="imgCalculator" Style="{StaticResource ButtonNavigationBarImageStyle}" Source="{TemplateBinding CalculatorImage}">
<Image.GestureRecognizers>
<TapGestureRecognizer Tapped="OnTappedCalculator"/>
</Image.GestureRecognizers>
</Image>
<Image Grid.Row="1" Grid.Column="3" AutomationId="LatestButton" Margin="0,5,0,10" x:Name="imgLatest" Style="{StaticResource ButtonNavigationBarImageStyle}" Source="{TemplateBinding LatestImage}">
<Image.GestureRecognizers>
<TapGestureRecognizer Tapped="OnTappedLatest"/>
</Image.GestureRecognizers>
</Image>
<Image Grid.Row="1" Grid.Column="4" AutomationId="AboutUsButton" Margin="0,5,0,10" x:Name="imgAboutUs" Style="{StaticResource ButtonNavigationBarImageStyle}" Source="{TemplateBinding AboutUsImage}">
<Image.GestureRecognizers>
<TapGestureRecognizer Tapped="OnTappedAboutUs"/>
</Image.GestureRecognizers>
</Image>
</Grid>
</StackLayout>
</AbsoluteLayout>
</ControlTemplate>
In the picture below you can see what the overdraw is after the changes.
Products ListView
Looking at the ListView in the products page:
<ListView Grid.Row="2" x:Name="LstProducts" SeparatorVisibility="None"
ItemsSource="{Binding ProductItems}" HasUnevenRows="True">
<ListView.Behaviors>
<behavior:EventToCommandBehavior EventName="ItemTapped"
Command="{Binding SelectProductCommand}"
EventArgsConverter="{StaticResource ItemTappedConverter}" />
</ListView.Behaviors>
<ListView.ItemTemplate>
<DataTemplate>
<ViewCell>
<Grid Padding="5,5,14,0" BackgroundColor="White">
<Grid.ColumnDefinitions>
<ColumnDefinition Width="30" />
<ColumnDefinition Width="*" />
</Grid.ColumnDefinitions>
<mr:StackLayout Grid.Column="0" DownCommand="{Binding BindingContext.CheckProductCommand, Source={x:Reference Name=ProductsPage}}"
DownCommandParameter="{Binding .}" HorizontalOptions="FillAndExpand" VerticalOptions="FillAndExpand">
<Image Margin="3" HeightRequest="25"
Source="{Binding Compare, Converter={StaticResource YesNoCheckBoxConverter}}" />
</mr:StackLayout>
<Grid Grid.Column="1" RowSpacing="0">
<Grid.RowDefinitions>
<RowDefinition Height="23" />
<RowDefinition Height="20" />
<RowDefinition Height="22" />
<RowDefinition Height="5" />
<RowDefinition Height="1" />
</Grid.RowDefinitions>
<Label Grid.Row="0" Text="{Binding Name}" Style="{StaticResource NameLabelStyle}" />
<Label Grid.Row="1" Text="{Binding Category}" Style="{StaticResource CategoryLabelStyle}" />
<StackLayout Grid.Row="2" Orientation="Horizontal" Spacing="10">
<StackLayout Orientation="Horizontal" IsVisible="{Binding HasResin}">
<Label Text="{i18n:Translate ResinSemiColon}" Style="{StaticResource AttributeLabelStyle}" />
<Label Text="{Binding ShowResinType}" Style="{StaticResource AttributeValueStyle}"/>
</StackLayout>
<StackLayout Orientation="Horizontal" IsVisible="{Binding HasDryTg_C}">
<Label Text="{i18n:Translate DryTgSemiColon}" Style="{StaticResource AttributeLabelStyle}" />
<Label Text="{Binding DryTg_C, StringFormat='{0}°C'}" Style="{StaticResource AttributeValueStyle}"/>
</StackLayout>
<StackLayout Orientation="Horizontal" IsVisible="{Binding HasDryTg_F}">
<Label Text="{i18n:Translate DryTgSemiColon}" Style="{StaticResource AttributeLabelStyle}" />
<Label Text="{Binding DryTg_F, StringFormat='{0}°F'}" Style="{StaticResource AttributeValueStyle}"/>
</StackLayout>
<StackLayout Orientation="Horizontal" IsVisible="{Binding HasCureOptimal_C}">
<Label Text="{i18n:Translate CureSemiColon}" Style="{StaticResource AttributeLabelStyle}" />
<Label Text="{Binding CureOptimal_C, StringFormat='{0}°C'}" Style="{StaticResource AttributeValueStyle}"/>
</StackLayout>
<StackLayout Orientation="Horizontal" IsVisible="{Binding HasCureOptimal_F}">
<Label Text="{i18n:Translate CureSemiColon}" Style="{StaticResource AttributeLabelStyle}" />
<Label Text="{Binding CureOptimal_F, StringFormat='{0}°F'}" Style="{StaticResource AttributeValueStyle}"/>
</StackLayout>
</StackLayout>
<BoxView Grid.Row="4" HeightRequest="1" HorizontalOptions="FillAndExpand" Color="{StaticResource GreyColor30}" />
</Grid>
</Grid>
</ViewCell>
</DataTemplate>
</ListView.ItemTemplate>
</ListView>
Each item in the ListView does have a lot of visual elements. Here some changes can be made.
The same ListView items can be presented with an AbsoluteLayout:
<ListView Grid.Row="2" x:Name="LstProducts" SeparatorVisibility="None" CachingStrategy="RecycleElement" BackgroundColor="White"
ItemsSource="{Binding ProductItems}" HasUnevenRows="True">
<ListView.Behaviors>
<behavior:EventToCommandBehavior EventName="ItemTapped"
Command="{Binding SelectProductCommand}"
EventArgsConverter="{StaticResource ItemTappedConverter}" />
</ListView.Behaviors>
<ListView.ItemTemplate>
<DataTemplate>
<ViewCell>
<AbsoluteLayout>
<mr:Image HeightRequest="25" Source="{Binding Compare, Converter={StaticResource YesNoCheckBoxConverter}}"
DownCommand="{Binding BindingContext.CheckProductCommand, Source={x:Reference Name=ProductsPageRef}}"
DownCommandParameter="{Binding .}" AbsoluteLayout.LayoutBounds="5,2,25,25" />
<Label Text="{Binding Name}" Style="{StaticResource NameLabelStyle}" AbsoluteLayout.LayoutBounds="50,2,AutoSize,AutoSize" />
<Label Text="{Binding Category}" Style="{StaticResource CategoryLabelStyle}" AbsoluteLayout.LayoutBounds="50,25,AutoSize,AutoSize" />
<Label IsVisible="{Binding HasResin}" AbsoluteLayout.LayoutBounds="50,45,AutoSize,AutoSize"
FormattedText="{Binding ShowResinType}">
</Label>
<BoxView HeightRequest="1" Margin="0,0,0,5" HorizontalOptions="FillAndExpand" Color="{StaticResource GreyColor30}"
AbsoluteLayout.LayoutBounds="50,70,1,AutoSize"
AbsoluteLayout.LayoutFlags="WidthProportional" />
</AbsoluteLayout>
</ViewCell>
</DataTemplate>
</ListView.ItemTemplate>
</ListView>
The same presentation but the overdraw is much better now.

